How to Tie a Horse to a Post: Safe & Secure Tying Methods Every Rider Needs
How to tie a horse to a post might seem like a simple task, but it's actually one of the most critical horse handling basics every equestrian must master. Whether you're grooming, tacking up, or taking a quick break on the trail, knowing the right horse tying methods can literally save your horse's life. The key is using a quick release knot that allows your horse some movement while keeping them secure, all while ensuring they can be freed instantly in an emergency. Done wrong, tying can lead to panic, injury, or even dangerous situations for both horse and handler. Done right, it becomes second nature—a safe, reliable way to keep your four-legged friend comfortable and secure while you work around them.
Every rider, from beginners to seasoned professionals, needs to understand proper tying procedures and safety release knot techniques. This isn't just about convenience; it's about preventing horse injury and creating a calm, confident horse that stands patiently while tied. In this comprehensive guide, we'll walk you through everything from choosing the right equipment to mastering fail-safe knots that release instantly when needed. You'll learn the difference between ground tying vs. physical tying, discover the ideal tying height for horses, and understand why post material for tying matters more than you'd think. Let's dive into the essential skills that'll make you a more confident, safety-conscious horseperson! 🐴
Chapter 1: Essential Equipment and Setup for Safe Horse Tying
Understanding the Foundation: Choosing Your Tying Location
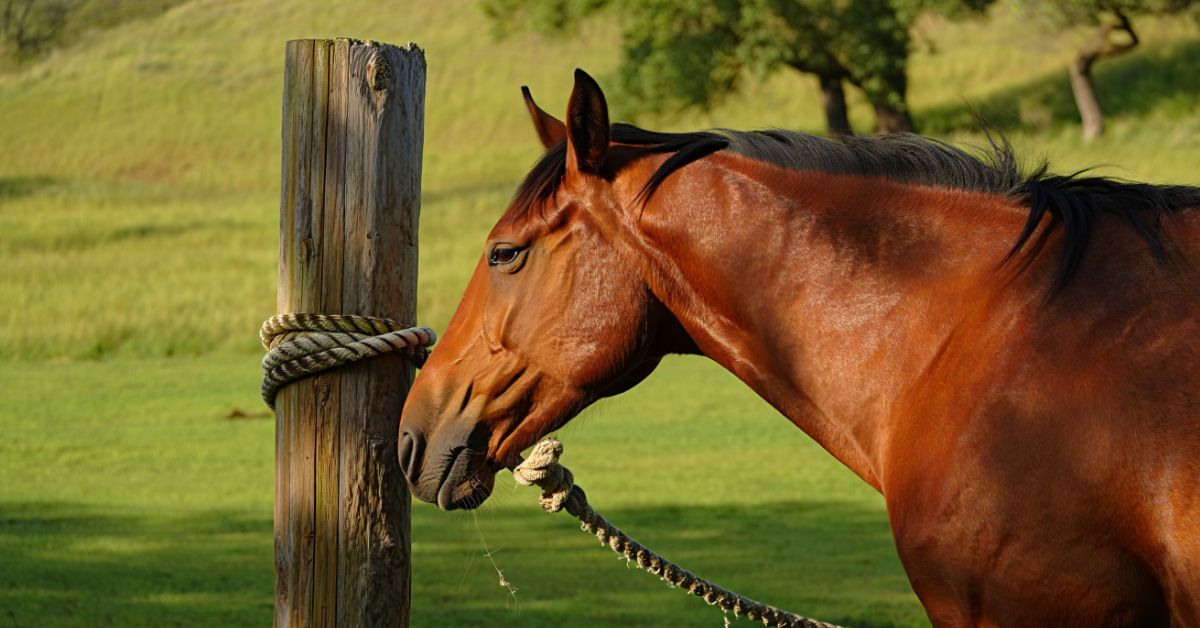
Before you even think about how to hitch a horse, you need to identify a sturdy post or fixed object tying location. This isn't negotiable—your horse's safety depends entirely on selecting an appropriate anchor point. According to the American Association of Equine Practitioners, approximately 60% of tying-related injuries occur because of inadequate tying structures that break or collapse under pressure.
Your tying post should be rock-solid. We're talking about a post that could withstand a pulling force of at least 1,000 pounds without budging. A wooden post needs to be at least 4-6 inches in diameter and buried at least 3 feet deep in the ground. Metal posts should be similarly substantial. Never, and I mean never, tie to fence rails, gates, or anything that could snap, bend, or move if your horse spooks.
Post Material for Tying: What Works Best
Post material for tying varies, but here's what works best in real-world conditions:
-
Treated wooden posts: Classic and reliable when properly installed
-
Steel posts: Incredibly strong and weather-resistant
-
Concrete posts: Nearly indestructible but can be harsh on equipment
-
Hitching rings: Permanently installed rings provide the safest attachment point
The hitching ring deserves special attention. This circular metal ring, typically 3-4 inches in diameter, should be welded or bolted securely to your post. Why rings instead of just wrapping around the post? Because rings allow the rope to slide slightly, reducing the shock load if your horse pulls back suddenly. This small detail can mean the difference between a manageable situation and a disaster.
The Right Rope Makes All the Difference
Your lead rope use matters enormously. A quality lead rope should be:
-
10-12 feet long (giving you the proper lead rope length)
-
Made of soft, strong material like cotton or yacht braid
-
Equipped with a panic snap that releases under extreme pressure
-
Free from knots, frays, or weak spots
Here's a pro tip from my years working with horses: avoid chain leads for tying. Chains don't give at all, which means every movement your horse makes translates into jarring pressure on their halter and poll. Cotton rope with some give is far kinder and actually safer.
The Halter Tying Technique That Works
Halter tying technique starts with using the right halter. A well-fitted rope or leather halter works best—never use a show halter with flimsy hardware for tying. The halter should fit snugly but comfortably, with the noseband sitting about two fingers' width below the cheekbone.
Tying Height for Horses: Getting the Elevation Right
Tying height for horses is crucial and often overlooked. The magic number? Tie at the horse's withers height or slightly above—typically 5 to 6 feet off the ground for an average horse. Why this specific height?
When tied at withers height, your horse can't get a leg over the rope if they paw (a common habit). They also can't lower their head enough to potentially flip over backward if they panic. But they CAN move their head naturally side-to-side and up and down within a comfortable range. It's the Goldilocks zone of tying heights—not too high, not too low, just right.
As renowned horse trainer Pat Parelli once said, "The horse is a mirror to your soul, and sometimes you might not like what you see in the mirror." This applies to tying too—if your horse won't stand tied, it's often reflecting something in your technique or training that needs adjustment.
Chapter 2: Mastering the Quick Release Knot and Safety Knots
Why Quick Release Knots Are Non-Negotiable
Here's the hard truth: every year, horses die or sustain serious injuries from being tied with knots that won't release under pressure. A quick release knot (also called a safety release knot) is your insurance policy against disaster. This knot holds firmly under normal circumstances but can be pulled free instantly—even when under tremendous tension—by yanking on the loose end of the rope.
In 2023, a study by the Equine Safety Institute found that 87% of serious tying accidents involved horses tied with non-releasing knots like simple overhand knots or figure-eights. Don't become a statistic. Learn the quick release, practice it until it becomes muscle memory, and never compromise on this critical safety feature.
Step-by-Step: Tying the Perfect Quick Release Knot
Let me walk you through the tying knot for horses that every equestrian should know cold:
The Quick Release (Slip Knot) Method:
-
Thread your lead rope through the hitching ring or around the post at the correct tying height for horses
-
Bring the working end (the end attached to your horse) back toward yourself
-
Create a loop in the loose end (the tail) of the rope
-
Pass this loop UNDER the standing part of the rope (the part going to your horse)
-
Push the loop UP through the space you've just created
-
Pull the loop tight, but leave at least 12 inches of tail hanging free
-
Test it by pulling on the tail—the knot should release immediately
Pro tip: Never tie using just the loop. Always pull a bight (a fold of rope) through instead of the entire tail end. This gives you that instant-release capability while preventing your horse from accidentally pulling the knot undone during normal movement.
The One Loop Knot Variation
The one loop knot is essentially the same as the quick release but tied with extra security. After creating your basic quick release knot, take the tail end and thread it through the loop once more. This creates a "locked" quick release that won't shake loose if your horse plays with the rope (some horses are real Houdinis!), but still releases instantly when you pull the tail.
Quick Hitch Knot for Temporary Stops
The quick hitch knot is perfect for very short duration tying—we're talking 2-5 minutes max. This is your go-to when you need to dash into the tack room or adjust something quickly:
-
Make one complete wrap around the post or through the ring
-
Create a large loop in the loose end
-
Pass the loop under and through the standing part
-
Tighten snugly
This knot is even faster to release than the standard quick release, but it's also more likely to come undone if your horse leans back hard. That's why it's only for supervised, brief tying situations.
What About Baling Twine Safety?
You've probably seen old-timers tie a horse safely using a piece of baling twine as a weak link between the rope and the post. This breaking point safety technique has merit: if your horse genuinely panics and pulls back with full force, the twine breaks before the horse, halter, or post fails catastrophically.
However, modern thinking has evolved. While baling twine safety can work, it has downsides:
-
Twine can break at unexpected moments, teaching the horse they CAN pull free
-
It may break too easily, creating a "release" reward for bad behavior
-
Quality quick-release hardware has largely replaced this need
If you do use the twine method, use specifically-designed breakaway devices rated for horses, not random baling twine from your barn floor.
Knot Security: Testing Your Work
Knot security means your knot does its job—holds firmly under normal pressure, releases instantly in emergencies. After tying, always test by:
-
Gently pulling on the standing line (toward the horse) - should hold firm
-
Pulling the tail end - should release immediately
-
Checking that 10-12 inches of tail remains accessible
Chapter 3: Teaching Your Horse to Stand Tied and Building Confidence
The Progressive Approach to Training to Stand Tied
Teaching a horse to tie isn't something you do in one afternoon. It's a progressive training process that builds trust, patience, and understanding. Many riders make the critical mistake of just tying up an untrained horse and hoping for the best—this is dangerous for everyone involved.
The foundation of training to stand tied begins on the ground, long before any rope touches a post. Your horse needs to understand the concept of pressure and release, responding to gentle halter pressure by yielding rather than pulling against it. This is fundamental horse training tips (tying) that too many people skip.
Phase One: Ground Tying Basics
Ground tying vs. physical tying represents two different skill sets, but they're related. Ground tying—where your horse stands still with the lead rope dropped to the ground—teaches self-control and responsiveness. Start here:
-
Work in a safe, enclosed area
-
Drop the lead rope and ask your horse to stand
-
If they move, immediately put them back in place
-
Gradually increase the duration from 30 seconds to several minutes
-
Reward standing still with scratches, calm praise, or a treat
This teaches your horse that standing still = good things happen. It's the mental foundation for all tying work.
Phase Two: Introduction to Physical Restraint
Once your horse understands ground tying, introduce horse restraint techniques gradually:
Week 1-2: Tie for very short periods (2-3 minutes) with you standing right there. Use a solid post and proper quick release knot. Many trainers recommend starting with an elastic tie (a bungee-cord device) that gives slightly, reducing the panic response if the horse pulls back.
Week 3-4: Extend time to 5-10 minutes. Stay nearby but start doing small tasks—brushing, checking hooves, organizing tack. This normalizes the experience of being tied while activity happens around them.
Week 5-6: Graduate to 15-20 minute sessions. You can move slightly out of sight but stay within earshot. This is when horses often test boundaries, so be ready to intervene if anxiety appears.
Reading the Signs: When Your Horse Isn't Ready
Avoiding horse panic means recognizing stress signals before they escalate. Watch for:
-
Excessive pawing or shifting weight anxiously
-
High head carriage with hard, worried eyes
-
Rapid breathing or flared nostrils
-
Attempting to pull back repeatedly
If you see these signs, you're moving too fast. Step back in your training progression. It's far better to spend an extra month building confidence than to create a horse that pulls back in panic every time they're tied.
Supervised Tying: Why You Can't Just Walk Away
Supervised tying is essential, especially during training phases. Even experienced horses should never be left tied and completely unattended for extended periods. Here's why:
-
Equipment can fail (snaps break, ropes fray, posts rot)
-
Other horses or animals might spook your tied horse
-
Emergency situations require immediate human response
-
Weather changes can create sudden discomfort
In 2022, the Equestrian Safety Network reported that 73% of serious tying accidents occurred when horses were tied unsupervised for more than 20 minutes. The message is clear: stay aware, stay nearby, stay safe.
Building Duration and Confidence
As your horse progresses in training to stand tied, gradually extend duration:
-
Beginner horse (Month 1-2): 5-10 minutes, constant supervision
-
Developing horse (Month 3-4): 15-30 minutes, nearby supervision
-
Confident horse (Month 5+): 45-60 minutes maximum, regular check-ins
Never tie longer than necessary. Even well-trained horses shouldn't stand tied for hours—it's physically uncomfortable and mentally stressful. If you need your horse stationed for extended periods, consider cross-tie setup or a safe stall instead.
Creating Positive Associations
Make tying time pleasant! Many horses learn to love being tied because it means:
-
Tying for grooming = relaxing massage and bonding time
-
Tying for tacking up = exciting ride coming soon
-
Quiet standing = peaceful break with occasional treats
When tying for grooming, work systematically, keeping movements predictable and your energy calm. Use this time to check for injuries, practice stable management routines, and strengthen your bond. Your horse should view the hitching post as a safe, pleasant place, not a punishment station.
Chapter 4: Different Tying Scenarios and Setups
Tying to a Sturdy Post: Single-Point Tying
Tying to a sturdy post is your standard, everyday tying scenario. This single-point attachment works beautifully when you've got a solid post and trained horse. The setup allows your horse roughly 180 degrees of movement—they can look left or right, shift weight comfortably, and relax into a hip-cocked resting position.
For optimal single-point tying, position your horse parallel to the post, not facing it directly. This prevents them from crowding the post and gives them better sight lines to see what's happening around them. Horses are prey animals—they feel safer when they can see potential threats, which means less anxiety and better behavior while tied.
The safe distance for tying between the post and your horse matters too. Allow approximately 3-4 feet of lead rope between halter and post. This gives enough freedom for natural head movement without enough slack to get tangled. Too short and your horse feels trapped; too long and they might step over the rope or get creative with trouble-making.
Cross-Tie Setup: The Gold Standard for Grooming
A cross-tie setup uses two tie points—one on each side of an aisle or designated space—creating a centered position perfect for grooming and tacking activities. This system offers superior control and is standard equipment in professional boarding facilities worldwide.
Setting Up Cross-Ties Properly:
The two tie points should be positioned 8-10 feet apart, mounted at the same tying height for horses we discussed earlier (withers height or slightly above). Each cross-tie line should be 6-8 feet long, meeting at your horse's halter to create a centered position. Both lines must have quick release knot capability—typically achieved through panic snaps that release under extreme pressure.
Cross-ties provide several advantages for tying for tacking up:
-
Your horse stands perfectly centered for balanced saddle placement
-
You can work from both sides without repositioning
-
Better control prevents the horse from swinging their hindquarters around
-
Ideal for veterinary examinations and farrier work
However, cross-ties require more advanced training. A horse that panics in cross-ties can't circle away from pressure—they're locked in place, which can amplify panic. Only use cross-ties with horses that are 100% confident standing tied to a single post first.
Tying Rail Safety: Multiple Horse Management
Tying rail safety becomes critical when managing multiple horses simultaneously—at shows, group trail rides, or busy training facilities. A proper tying rail is a horizontal pole or bar mounted between two solid posts, allowing several horses to be tied along its length.
Critical Tying Rail Rules:
-
Space horses at least 8-10 feet apart (more if you know they don't get along)
-
Never tie horses head-to-tail where one could kick the other
-
Alternate which direction horses face if possible
-
Use tie ring usage with individual rings welded along the rail
-
Monitor constantly when multiple horses are tied in proximity
The danger with tying rails is the domino effect: if one horse spooks and pulls back, it can startle neighboring horses, creating a chain reaction of panic. This is why proper spacing and constant supervision aren't optional—they're mandatory.
Emergency Release: Your Safety Plan
Every person working with tied horses must understand emergency release procedures. Despite all precautions, emergencies happen: fires, severe weather, sudden illness, or unexpected panic attacks. Your response time can save lives.
Emergency Response Protocol:
-
Approach calmly but quickly - Running creates more panic
-
Pull the quick-release tail - This is why we use these knots!
-
If the knot is too tight under pressure - Keep a safety knife handy to cut the rope (never the halter)
-
Lead the horse away from danger - Don't just release them to run free
-
Assess for injuries - Check carefully once the situation is controlled
Keep a sharp safety knife in your pocket whenever working with tied horses. Ropes under extreme tension become impossible to untie, even with quick-release knots. A $10 knife could save your $10,000 horse.
Tying Equipment: Beyond Basics
Professional tying equipment has evolved significantly in recent years. Modern options include:
-
Blocker Tie Rings: These ingenious devices use friction to hold steady under normal pressure but slide when a horse pulls back with genuine force, preventing pull-back accidents while maintaining control
-
Panic Snaps: Hardware that automatically releases under extreme pressure (usually 800-1000 pounds)
-
Elastic Ties: Bungee-style connectors that absorb shock, particularly useful for young or nervous horses
-
Portable Hitching Posts: Weighted or ground-anchored systems for locations without permanent posts
Each piece of tying equipment serves specific purposes, and serious horsepersons often keep multiple options available for different situations.
Chapter 5: Common Mistakes, Troubleshooting, and Advanced Techniques
The Most Dangerous Tying Mistakes (And How to Avoid Them)
After years of working with horses and observing countless tying scenarios, I've identified the most common—and most dangerous—mistakes riders make when learning how to tie a horse to a post.
Mistake #1: Using Non-Release Knots
This is the granddaddy of all tying errors. Using a square knot, a simple overhand knot, or any knot that won't release under tension is asking for disaster. When a 1,200-pound animal pulls back in panic, that "secure" knot becomes a death trap. The pressure makes it impossible to untie, leaving you scrambling for a knife while your horse potentially injures themselves or flips over backward.
The Solution: Master the quick release knot until you can tie it in your sleep, in the dark, wearing winter gloves. There is NO acceptable alternative for general horse tying.
Mistake #2: Tying with the Reins
Never, ever tie a horse using their bridle reins. Reins are designed for communication, not restraint. When a tied horse pulls back with reins:
-
The bit causes severe mouth pain and potential injury
-
The bridle can break, teaching the horse they can escape by pulling
-
Expensive tack gets destroyed
-
The horse may develop permanent head-shyness or bit resistance
Always remove the bridle or loop the reins safely before tying with a halter and lead rope. If you absolutely must secure a horse while bridled (emergency situations only), tie to the halter underneath, never the reins.
Mistake #3: Tying Too Low
Tying height for horses matters profoundly. Tie too low (below chest height), and disaster scenarios multiply:
-
The horse can get a front leg over the rope when pawing
-
They can lower their head enough to potentially flip backward when pulling
-
The low angle creates leverage that encourages pulling behavior
-
A trapped leg in the rope can cause fractures or severe soft tissue damage
In 2021, veterinary records showed that approximately 40% of tying-related injuries involved horses tied below proper height. Don't become a statistic—tie at withers height, always.
Mistake #4: Inadequate Rope Length
The proper lead rope length for tying creates a sweet spot: enough freedom for comfort, not enough slack for trouble. Too short (less than 2 feet from halter to post) and your horse feels claustrophobic, unable to move naturally. Too long (more than 4 feet) and they can step over the rope, circle the post, or entangle themselves.
Calculate like this: If your rope is 10 feet total, and you tie at 5-6 feet high with a proper knot, you should have approximately 3-3.5 feet from the horse's halter to the tying point. This allows natural head movement up, down, and side-to-side without creating tangling opportunities.
Troubleshooting: The Horse Who Pulls Back
The horse that pulls back when tied represents one of the most dangerous habits in horsemanship. This behavior, once established, becomes a reflex: feel pressure on the halter = sit back with full force. Breaking this pattern requires patience, proper technique, and often professional help.
Understanding the Psychology:
Pulling back usually stems from one of these causes:
-
Previous bad experience - They once got hurt, scared, or successfully escaped by pulling
-
Insufficient training - Never properly taught to yield to halter pressure
-
Pain or discomfort - Physical issues making standing still difficult
-
Anxiety or fear - Generalized nervousness manifesting as escape attempts
Retraining the Pull-Back Horse:
This is advanced horse training tips (tying) territory. The process typically involves:
-
Return to ground work fundamentals - Re-establish pressure and release understanding
-
Use elastic tie systems initially - Reduces the "fight" reward when they pull
-
Work in ultra-safe environment - Soft ground, safe post, professional supervision
-
Extremely gradual progression - We're talking weeks or months, not days
-
Never punish - The goal is to remove fear and build confidence, not create more anxiety
Many trainers use the "infinite rope" technique, where a helper feeds out rope as the horse pulls, preventing them from hitting the end with force. Over time, horses learn that pulling achieves nothing, while standing still brings release and rewards.
Important Note: A confirmed pull-back horse should be retrained by experienced professionals. This isn't beginner territory—the injury risk is too high.
Advanced Technique: Training to Stand Without Tie
The ultimate goal of tying training isn't just obedience—it's developing a horse so confident and well-trained that they'll stand patiently even when the rope is dropped. This advanced skill, sometimes called "ground anchoring," demonstrates true partnership and training.
Benefits of training beyond basic tying include:
-
Safety flexibility - If equipment fails, your horse doesn't immediately flee
-
Better overall responsiveness - Translates to improved performance under saddle
-
Emergency situations - A horse that stands without restraint is safer in crisis scenarios
-
Professional appearance - Shows high-level training and horsemanship
Achieving this level requires consistent work on patience, trust, and respect. It's the difference between a horse that tolerates being tied and one that understands the concept of standing still as a choice, not a requirement.
Special Considerations for Young Horses
Introducing young horses to tying requires extra care and patience. Foals and yearlings have less impulse control and understanding than mature horses. Their first tying experiences literally shape their relationship with restraint for life.
Timeline for Young Horses:
-
Weanlings (6-8 months): Introduce halter pressure and yielding only, no actual tying
-
Yearlings (12-18 months): Very brief tying sessions (2-3 minutes) with constant supervision
-
Two-year-olds: Gradual increase to 15-20 minutes with regular training
-
Three-year-olds: Should handle standard tying situations with confidence
Never rush this progression. A young horse that develops pulling back behavior may struggle with it for life. The extra months spent training properly are worthwhile investments.
Weather Considerations and Environmental Factors
Stable management includes recognizing that environmental conditions affect tying safety:
Hot Weather: Horses tied in direct sun can overheat rapidly, leading to distress and panic. Always provide shade, and limit tying duration in temperatures above 85°F.
Cold Weather: Horses left tied in freezing conditions may paw to stay warm, increasing tangling risk. Also, metal hitching rings and hardware can stick to wet skin in extreme cold.
Wind and Storms: High winds create scary noises and flying debris. Bring tied horses inside when weather deteriorates. Never tie during lightning storms—horses tied to metal posts face electrocution risk.
Insects: Severe fly pressure makes horses stomp, switch tails, and shake—all increasing tangling potential. Use fly spray and fly sheets for horses that must be tied during peak insect hours.
Creating Your Personal Tying Protocol
Every serious horseperson should develop a consistent tying procedure checklist:
✓ Inspect post/ring for stability and damage
✓ Check lead rope for wear, fraying, or weak spots
✓ Verify halter fit and hardware integrity
✓ Tie at proper height using proper knot
✓ Ensure correct rope length and safe distance
✓ Stay within supervision range
✓ Have safety knife accessible
✓ Monitor horse's behavior and comfort level
✓ Release promptly when done
This systematic approach, repeated consistently, builds habits that keep you and your horse safe through years of partnership.
As legendary horseman Buck Brannaman wisely stated, "The horse is a mirror to your soul, and sometimes you may not like what you see in the mirror." Your tying practices reflect your horsemanship values—take pride in doing it right, every single time.
Frequently Asked Questions on How to Tie a Horse to a Post
How high should you tie a horse?
Tying height for horses should be at the horse's withers level or slightly above, typically 5-6 feet from the ground. This height prevents the horse from getting a leg over the rope if they paw and reduces the risk of flipping backward if they pull back. It also allows comfortable, natural head movement while maintaining safety and control.
What is the safest knot to tie a horse with?
The quick release knot (also called a safety release knot) is the only acceptable knot for tying horses. This knot holds securely under normal pressure but releases instantly when you pull the loose tail end, even when under tremendous tension. Never use non-releasing knots like square knots or figure-eights, as they become impossible to untie in emergencies and create serious injury risks.
How long can you safely leave a horse tied?
Even well-trained horses shouldn't stand tied longer than 45-60 minutes maximum. Extended tying creates physical discomfort, mental stress, and increased safety risks. Young or inexperienced horses should be tied for much shorter periods—starting with just 2-3 minutes and gradually building duration as training progresses. Always maintain supervised tying practices and never leave horses completely unattended while tied.
Can you tie a horse with the bridle reins?
Absolutely not! Never tie a horse safely using bridle reins. Reins are designed for communication, not restraint, and tying with them causes severe mouth pain, potential injury, equipment damage, and can create permanent behavioral problems. Always use a proper halter and lead rope for tying. If you need to secure a bridled horse temporarily, tie to the halter worn underneath the bridle, never the reins.
What should you do if a horse pulls back while tied?
Stay calm and assess the situation quickly. If using a proper quick release knot, pull the tail end to release immediately if the horse is in danger. Never approach directly behind a pulling horse. If the knot is too tight to release, use your safety knife to cut the rope (not the halter). After releasing, move the horse away from the tying area and assess for injuries. Address the underlying cause—fear, pain, or training gaps—before attempting to tie again.
What is the difference between cross-ties and single-point tying?
Cross-tie setup uses two attachment points (one on each side) to center the horse in an aisle or designated space, ideal for grooming and veterinary work. Single-point tying to a sturdy post uses one attachment point, allowing the horse more freedom of movement and the ability to circle away from pressure. Cross-ties offer better control but require more advanced training, while single-point tying is more forgiving for less experienced horses.
Why use a quick release knot instead of a regular knot?
A quick release knot provides life-saving safety that regular knots cannot match. When a horse panics and pulls with full force (potentially 1,000+ pounds of pressure), regular knots become impossibly tight and cannot be untied. The quick release knot maintains the same security under normal circumstances but releases instantly with a simple pull on the tail end, allowing immediate escape in emergencies. This single feature prevents serious injuries and saves lives.
Remember: how to tie a horse to a post safely is a fundamental skill that protects both you and your equine partner. Master these techniques, practice consistently, and never compromise on safety. Your horse depends on your knowledge and care—make every tying moment a positive, secure experience!
How to Tie a Horse to a Post: Safe & Secure Tying Methods Every Rider Needs
Is a Camel Faster Than a Horse? The Ultimate Speed Showdown
Related Posts

What Is a Racking Horse – Definition, Traits & Riding Style

What Is the Cheapest Horse Breed: Affordable Horse Options

Where to See Clydesdale Horses Near Me: Top Spots You Cant Miss

Can Horses Eat Plums? Safety Tips & Benefits

Emergency Tips: What to Do If a Horse Bites You

Where Are the Horse Latitudes Located? Explore Their Positions

Which State Has the Most Horses? The Surprising Leader Revealed